Tooty Fruitty Guide
How to build a high speed WordPress website
We road tested Fruitty WordPress theme and built a WordPress website with a page load speed of 0.1 seconds.
Below is the how to guide for advanced WordPress developers.
WordPress theme: Fruitty – HTML 1st WordPress theme
Page load speed: 0.1 seconds
Performance
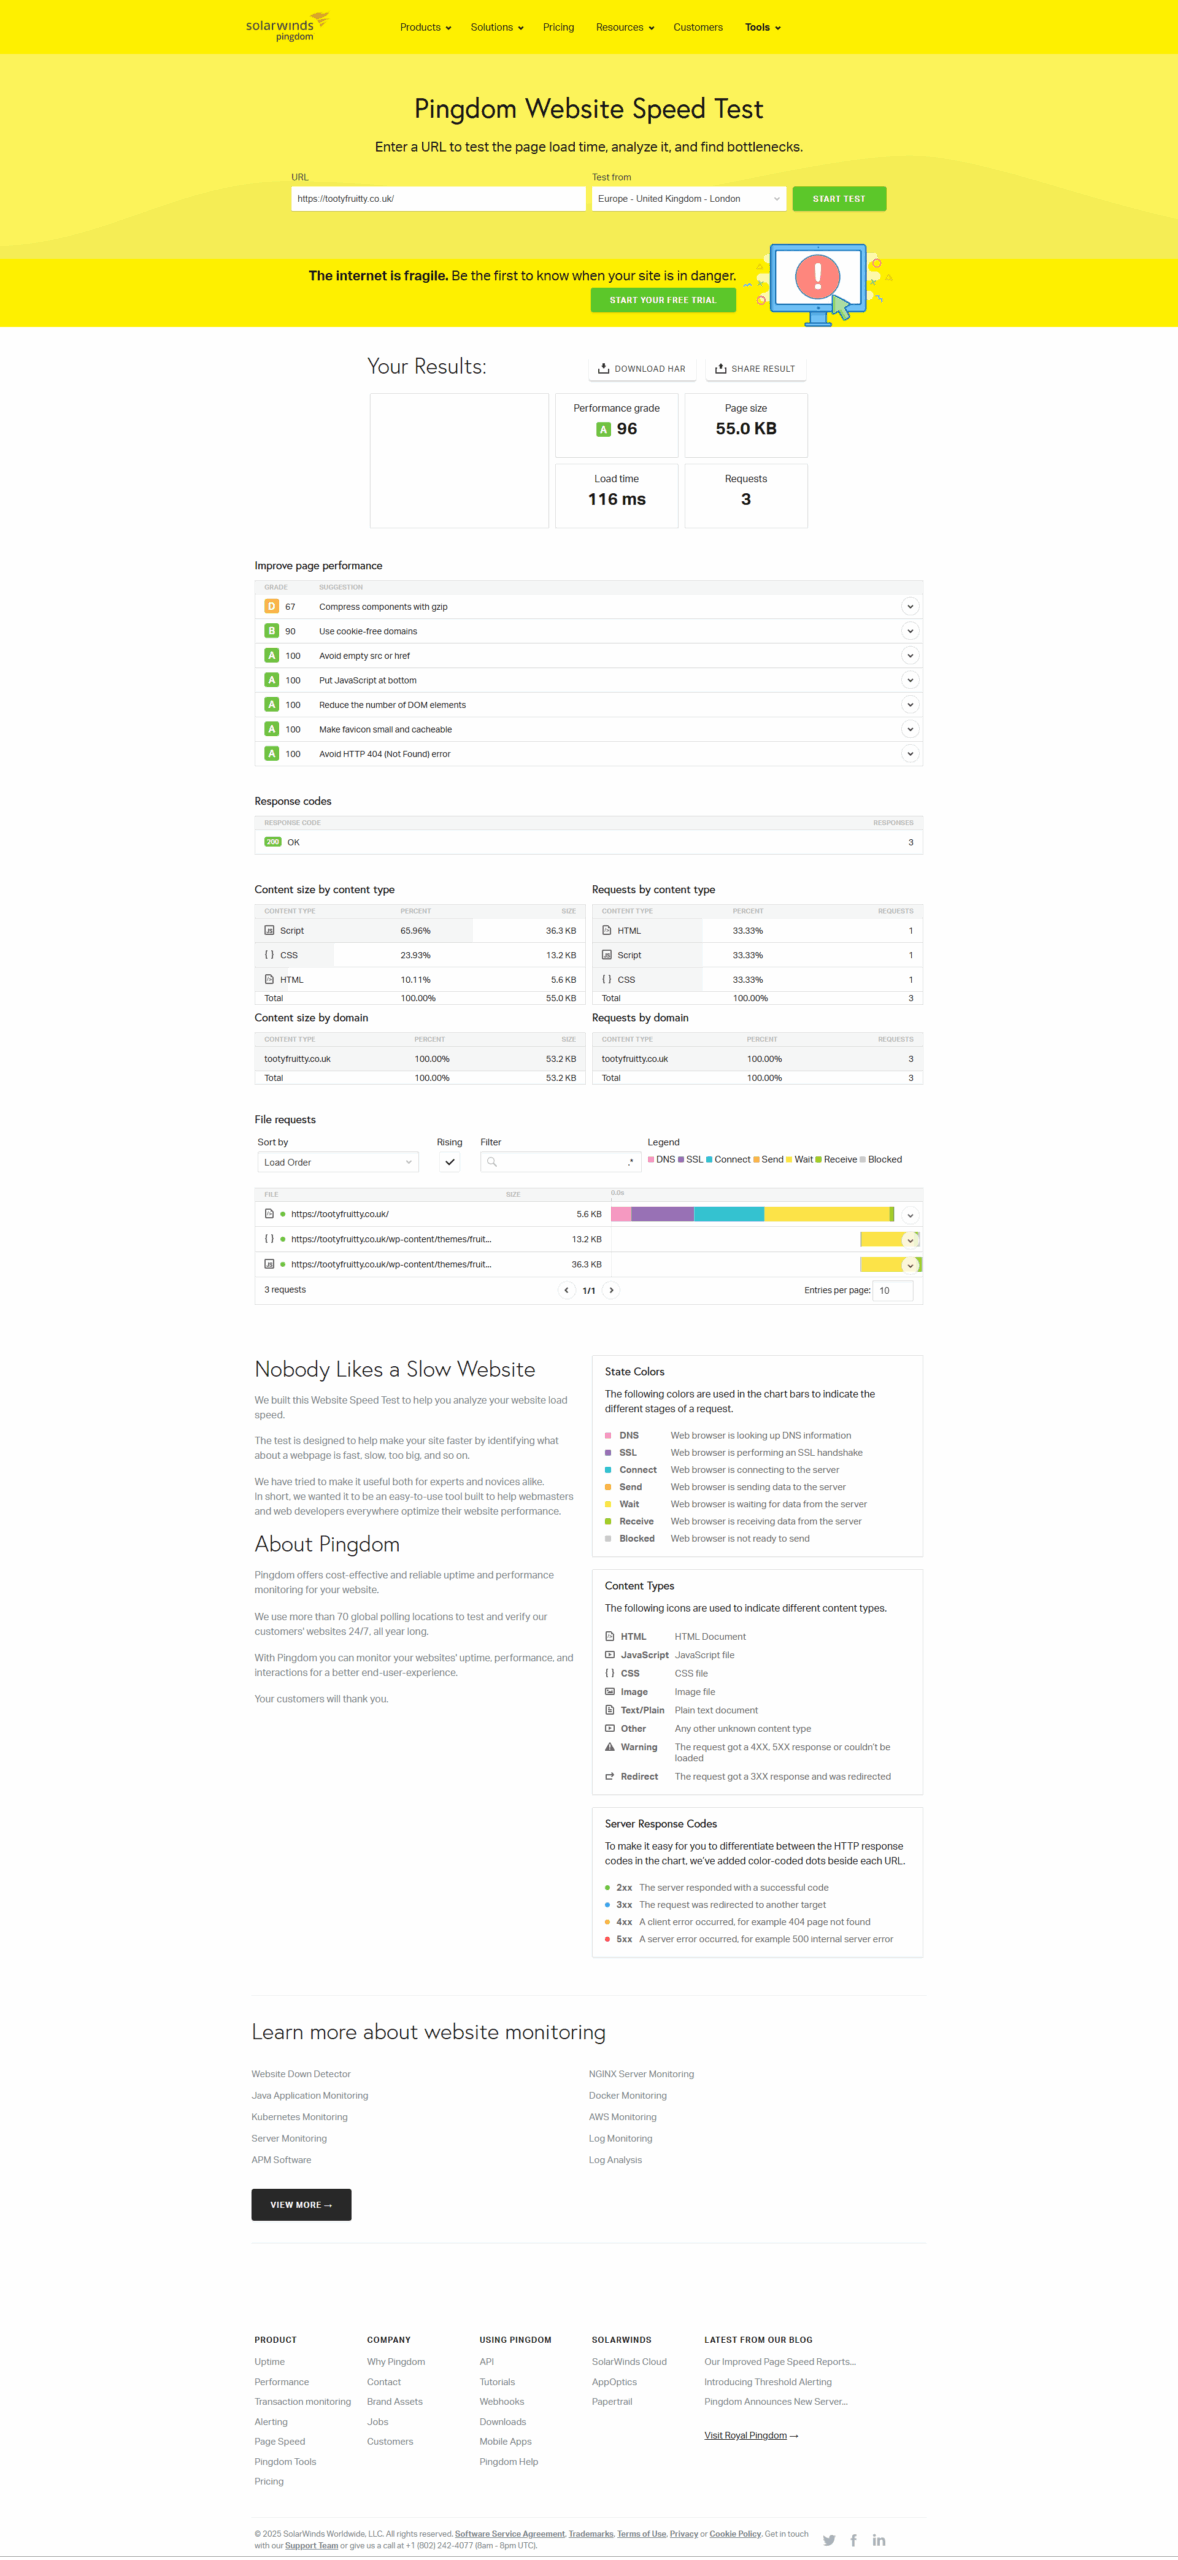
Pingdom website speed test (as per data source) results:
| Date | Load time | Requests | Performance grade | Page size |
| 14 June 2025 | 0.1 seconds | 3 | A (96/100) | 56.3 KB |
Test #2. Data source 0.116 seconds website page load speed
Google PageSpeed Insights mobile source data and desktop source data:
| 100/100 | 100/100 | 100/100 | 100/100 |
| Performance | Accessibility | SEO | Best Practises |
Page Genetics
| Words per page | 1,500 |
| Images per page | 0 |
Background
“Fruitty – HTML 1st WordPress theme for WordPress developers to build from” is an intelligent WordPress theme with Bootstrap, Pico CSS and Lineicons library support. It has a common file hierarchy enabling customisability and total control of website integrity.
Three interesting theme features:
- HTML first focus generates a time save during custom page template creation
- Source code appears like a normal website removing the dependency on wp_head() and wp_footer()
- Minimal <head> code ensures body content in the HTML source code is above the page fold for optimal search impact
Accounts
Step 1. Buy 1 X domain name with Heart Internet for the new WordPress website
Step 2. Buy 1 X DNS Made Easy account for Domain name server (DNS) management
Step 3. Buy 1 X WP Engine account for WordPress website hosting
At this stage you have signed up for three accounts and you are ready to complete our guide
WordPress website hosting
Step 4. Login to WP Engine
Step 5. (If your site hasn’t been created) Navigate to: Sites and click Add Site
Step 6. (Once your site has been created) Navigate to: Sites > YourSiteName and click YourSiteName
Step 7. Navigate to: Manage > Domain names
Step 8. Click Add domain and enter your domain name and make sure Set Primary is checked. Click Add
Step 9. Copy the IP Address for one A Record to a .txt file and save this for Step 13
Example:
| XXX.X.XXX.X |
At this stage you have have activated a WordPress installation on WP Engine
Domain records
Step 10. Login to Heart Internet
Step 11. Go to Manage > Domain names and select your domain name Manage Now
Step 12. Click DNS Management
Step 13. Change the following three records under A/AAAA/CNAME Records (see step 13 for IP Address) and save the changes
| XXX.X.XXX.X | |
| * | XXX.X.XXX.X |
| www | XXX.X.XXX.X |
| ftp | XXX.X.XXX.X |
Note: this change points your domain name to WP Engine. DNS record changes can take up to 72 hours to propagate across the internet. This step saves you time. You repeat a similar step below. Your website may go offline during this period of time.
At this stage you have pointed your domain to your WP Engine hosted WordPress website
DNS Management
Step 14. Login to DNS Made Easy
Step 15. Navigate to: DNS > Managed DNS
Step 16. Click Add domain enter your domain name and press OK (a new page opens)
Step 17. Scroll down to System NS Records. The records listed in the value table column are your domain name servers (DNS records).
Note: the full stop (.) nsXX.digicertdns.com. at the end of each record is not part of the nameserver don’t use this
Example:
| ns20.digicertdns.com |
| ns21.digicertdns.com |
| ns22.digicertdns.com |
| ns23.digicertdns.net |
Domain name
Step 18. Login to Heart Internet
Step 19. Navigate to: Manage > Domain names and select your domain name. Click Manage Now
Step 20. Select Change nameservers
Step 21. Select Custom nameservers and enter the four name values (DNS Made Easy nameservers) from Step 17 without entering the full stop at the end of each record and press change nameservers
Note: this change points your domain name to DNS Made Easy to manage your DNS Records. DNS record changes can take up to 72 hours to propagate across the internet. Your website may go offline during this period of time.
Step 22. Login to DNS Made Easy
Step 23. Click on the link to your domain name
Step 24. Under A Records click the + (opens a pop up window)
Step 25. Enter Name: www and enter the IP Address for the A Record from WP Engine (Step X) IP: XXX.X.XXX.X and press Submit
| Name | www |
| IP | XXX.X.XXX.X |
Step 26. Repeat same step (Step 24) but leave Name empty. Enter Name: IP: www and press Submit
| Name | |
| IP | XXX.X.XXX.X |
This DNS record change points the www and non www version of your domain name to WP Engine. Once domain propagation has completed your domain will point to your website hosted on WP Engine.
At this stage you have changed your nameservers to DNS Made Easy and pointed your domain name records in DNS Made Easy
Primary domain
Step 27. Login to DNS Made Easy
Step 28. Navigate to: Sites > YourSiteName > Click YourSiteName
Step 29. Navigate to: Manage > Cache > Press Clear all caches
Step 30. Press phpmyadmin at the top of the page (white button)
Step 31. In phpmyadmin click SQL
Example:
| Replace | With |
| oldurl.com | Current browser https://currentURL.com |
| newurl.com | New domain https://newURL.com |
Copy and paste this query and edit the two URLs (reference table) press Go
UPDATE wp_options SET option_value = replace(option_value, 'oldurl.com', 'newurl.com') WHERE option_name = 'home' OR option_name = 'siteurl';Copy and paste this query and edit the two URLs press Go
UPDATE wp_posts SET guid = replace(guid, 'oldurl.com','newurl.com');Copy and paste this query and edit the two URLs press Go
UPDATE wp_posts SET post_content = replace(post_content, 'newurl.com', 'oldurl.com');Copy and paste this query and edit the two URLs press Go
UPDATE wp_postmeta SET meta_value = replace(meta_value,'oldurl.com','newurl.com');Step 32. Login to your WordPress website by adding /wp-admin/ after your domain name
Step 33. Navigate to: Settings > General and check the two fields below match your new domain
| WordPress Address (URL) | https://newurl.com |
| Site Address (URL) | https://newurl.com |
Step 34. Click save changes anyway
Step 35. Navigate to Settings > Permalink and confirm your permalink structure
| Permalink structure | Post name |
Step 36. Click save changes at least two times to flush your WordPress website permalinks
At this stage you have set your site URL to the domain you purchased from Heart Internet
WordPress theme changes
Step 37. Download Fruitty – HTML 1st WordPress theme and install it in your WordPress website. In your WordPress dashboard navigate to: Appearances > Themes > Add New upload fruitty.zip and activate the theme.
A file editor and an sftp file manager is required to complete the next steps. SFTP settings are in Manage > Users and SFTP
Step 38. Copy the contents of scripts.js and paste to replace file contents: /wp-content/themes/fruitty/scripts/scripts.js
Step 39. Copy the contents of style.css and paste to replace file contents: /wp-content/themes/fruitty/style.css
Step 40. Replace header.php with the following code:
<!DOCTYPE html>
<html <?php language_attributes(); ?>>
	<head>
		<meta charset="<?php bloginfo('charset'); ?>">
<?php /* wp_head(); */ ?>
		<title><?php echo $GLOBALS["__title"]; ?></title>
		<meta name="description" content="<?php echo $GLOBALS["__description"]; ?>">
		<meta name="keywords" content="<?php echo $GLOBALS["__keywords"]; ?>">
		<link rel="canonical" href="<?php echo $GLOBALS["__canonical"]; ?>">
		<link rel="icon" type="image/png" sizes="32x32" href="data:image/png;base64, RnJ1aXR0eQ==">
		<meta name="viewport" content="width=device-width, initial-scale=1, shrink-to-fit=no">
		<link rel="stylesheet" href="<?php echo get_stylesheet_uri(); ?>?version=<?php echo rand(10,1000); ?>">
	</head>
	<body <?php body_class(); ?>>
		<header class="container pt-5">
			<hgroup>
				<h1><a href="/"><?php bloginfo('name'); ?></a></h1>
				<p><?php bloginfo('description'); ?></p>
			</hgroup>
			<nav>
				<ul>
					<li>
						<details class="dropdown">
							<summary role="button" class="secondary">Navigation</summary>
							<ul>
								<li><a href="<?php echo get_site_url(); ?>">Home</a></li>
							</ul>
						</details>
					</li>
				</ul>
				<ul>
					<li><a href="#" data-theme-switcher="auto">Auto</a></li>
					<li><a href="#" data-theme-switcher="light">Light</a></li>
					<li><a href="#" data-theme-switcher="dark">Dark</a></li>
				</ul>
			</nav>
    	</header>
Step 41: Replace footer.php with the following code:
<footer class="container">© Fruitty 2025</footer>
<script src="<?php echo get_template_directory_uri(); ?>/js/scripts.js"></script>
<?php /* wp_footer(); */ ?>
</body>
</html>Step 42. Remove theme library files and demo templates:
- Remove folder bootstrap/
- Remove folder css/
- Remove file js/jquery.js
- Remove folder lineicons
- Remove folder pico
- Remove page-custom-template-bootstrap.php
- Remove page-custom-template-lineicons.php
- Remove page-custom-template-pico.php
- Remove page-front-page.php
At this stage you have modified Fruitty to load faster without additional resources
Optimise your WordPress theme files to cache
Step 43. Edit header.php
Find
<link rel="stylesheet" href="<?php echo get_stylesheet_uri(); ?>?version=<?php echo rand(10,1000); ?>">Replace
<link rel="stylesheet" href="<?php echo get_stylesheet_uri(); ?>">Step 44. Edit footer.php
Find
<script src="<?php echo get_template_directory_uri(); ?>/js/scripts.js?version=<?php echo rand(10,1000); ?>"></script>
Replace
<script src="<?php echo get_template_directory_uri(); ?>/js/scripts.js"></script>At this stage you have modified Fruitty to become more dependant on the WP Engine cache system and load quicker
Optimise your database
Step 45. In WordPress go to: Plugins > Add Plugin > Search: WP-Optimize (with the hyphen)
Step 46. Click Install and click Activate
Step 47. Go to: WP-Optimize > Settings click Database (top right)
Step 48. Check all the checkbox and press Run All Selected Optimizations
Step 49. Go to Plugins > WP-Optimize and press Deactivate
Step 50. Go to Plugins > WP-Optimize and press Delete
At this stage you have optimized your WordPress database
Finish
You’re WordPress website is ready and speed optimised.
Suggestions/comments email: specialprojects@slibdesign.com
Demo: https://www.tootyfruitty.co.uk
Quick links
- Fruitty – HTML 1st WordPress theme
- childpluginwp.com – A framework for WordPress plugin modification
- wpchildtheme.co.uk – A Framework for WordPress theme modification
- slibdesign.com WordPress developer since 2006
- Power Tools | Buildpowertool.co.uk DEWALT, MILWAUKEE, MAKITA, FESTOOL.. 7894 Products online
- Proximitysport.co.uk | Bike | Ski & Snowboard | Surf | Dive | Swim
- Diamondsareforeverx.co.uk – Jewellery to mark any occasion
- Bennyphonefix.co.uk – iPhone Screen Fix London